
Changing Profiles in Lester SCR Chargers
Charger Styles
These are general maintenance guidelines. Please consult your owner’s manual prior to performing any repairs or maintenance on this charger.

Old style vs. new style
Before changing the profile in your SCR charger, check if you have the old or new style charger (pictured to the left).
Then follow the directions below based on which style you have.
NOTE: Profile 1 and Profile 2 do not have a consistent specified wet or AGM setting. Please see our charger selection to purchase the charger configuration that fits your battery needs the most. Before changing profiles, please note what the original profile your charger is on and what battery setting it is tied to (wet or AGM).
Changing the Profile on Old Style Lester Chargers
Locate the Circuit Board
- Locate the sticker on your charger that will be marked with what configuration your charger is set on. This setting will be tied to either Profile 1 or Profile 2 once you open the charger.

- Use a Phillips head screwdriver to remove the 12 screws from the charger cover. Remove the cover from the charger.

- Locate the charger control board. The pin and jumper for changing the setting is on the circuit board at the rear of the charger housing.

-
Change the Jumper Profile
- Notice the black jumper. It is shown in the Profile 1 setting (top two prongs).

- To change to the Profile 2 setting, use needle-nose pliers to pull off the jumper and move it to the position as shown in the picture leaving one pin exposed at the top. Be sure to push the jumper all the way on.

- Re-assemble the cover onto the charger and label the back of the charger to show what the current configuration is for future reference.

Changing the Profile on New Style Lester Chargers
Locate the Circuit Board
- Locate the sticker on your charger that will be marked with what configuration your charger is set on. This setting will be tied to either Profile 1 or Profile 2 once you open the charger.
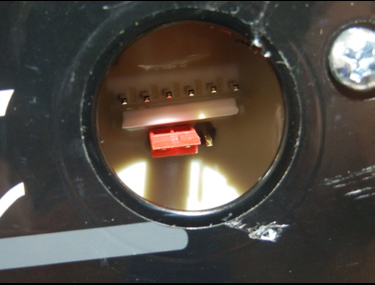
- Remove rubber cap in front of charger with a flathead screwdriver.

- The profile board will now be exposed.
-
Change the Jumper Profile
- The red jumper shown is Profile 1 where the right pin is exposed.

- To change to the Profile 2 setting. use needle-nose pliers to pull off the jumper and move it to the position as shown in the picture, leaving the left pin exposed. Be sure to push the jumper all the way on.

- Re-assemble the cover onto the charger and label the back of the charger to show what the current configuration is for future reference.